When applied with discipline and care, unit testing can be a powerful weapon in a software developer's arsenal. It allows a developer to garner feedback on functional correctness as well as refactor an existing codebase with security and confidence. Additional benefits of unit testing can be greater modularity, looser coupling, and an easier ability to measure whether software is meeting functional requirements.
There is a wealth of information on the Internet regarding unit testing and unit testing frameworks, but very few items are Windows Mobile specific. With the .NET Compact Framework, unit testing can currently be done with the Mobile Client Software Factory, released in mid-2006. And with the upcoming release of Visual Studio 2008 and the .NET Compact Framework version 3.5, unit tests are integrated into Visual Studio for managed mobile development.
The managed side is covered pretty well at this point (or will be when Visual Studio 2008 comes out), but what about the native side? What is available for C++ developers on Windows Mobile to use? One answer is CppUnitLite.
CppUnitLite was written by Michael C. Feathers, author of Working Effectively with Legacy Code. Feathers was also the original author of CppUnit and developed CppUnitLite when he realized that CppUnit could have been "smaller, easier to use, and far more portable if it used some C idioms and only a bare subset of the C++ language." [Feathers p48]
Here are steps to setup CppUnitLite for use with Windows Mobile.
1. Download CppUnitLite from the Object Mentor website.
2. Extract the following files from the om/CppUnitLite section of the zip file:
- Failure.h
- SimpleString.h
- Test.h
- TestHarness.h
- TestRegistry.h
- TestResult.h
- Failure.cpp
- SimpleString.cpp
- Test.cpp
- TestRegistry.cpp
- TestResult.cpp
(In this demo, these files have been extracted to C:\CppUnitLite)
3. Open the Solution which requires unit tests.(In this demo, the solution is named StackExample. This solution contains one project, Stack, which contains two files, Stack.h and Stack.cpp. Image 1 contains a screenshot of the solution loaded in the Solution Explorer. Stack.h is displayed in Code Listing 1. Stack.cpp is displayed in Code Listing 2.)
Image 1 - StackExample solution in Solution Explorer

Code Listing 1 - Stack.h
Code Listing 2 - Stack.cpp
4. Add a new Win32 Smart Device Project to the solution named CppUnitLite and place it in the directory where the CppUnitLite source code was extracted in Step 2.
Image 2 - Add New Project Wizard

5. Add all Windows Mobile platform SDKs to the new project.
Image 3 - Win32 Smart Device Project Wizard (Platform)

6. Set the Application type to Static Library and turn off Precompiled header in the Additional options section.
Image 4 - Win32 Smart Device Project Wizard (Application Settings)

7. Move the project file and the readme.txt file into the main directory where the CppUnitLite files are stored. The project needs to be removed and readded to the solution within Visual Studio.
Image 5 - Directory listing of CppUnitLite files.
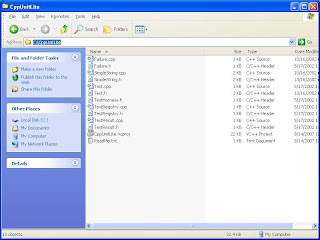
8. Using the Add->Existing Item... mechanism, add the header files (*.h) to the Header files section and add the source files (*.cpp) to the Source files section.
Image 6 - CppUnitLite project with all header and source files added

This walkthrough assumes that the code to be tested is in a static library (*.lib). In the example, Stack.h and Stack.cpp are in a static library project named Stack.
9. Add a new project to the solution and name it LibraryName.Tests. In the example, the project is named Stack.Tests.
10. Right-click on the project and choose properties. In the Common Properties->References section add the other two projects as references by using the Add New Reference button.
Image 7 - References added to the project properties.

11. In the Configuration Properties->C/C++->General section is an option named Additional Include Directories. Add the directories which contain the header files of the classes to be tested as well as the directory which contains the CppUnitLite header files. In the example, these two directories are ..\Stack and C:\CppUnitLite.
Image 8 - Additional Include Directories added to the project properties.

12. Add a .cpp file with a command line main method for Windows Mobile in it. This file should include TestHarness.h from CppUnitLite. In the main method, create a TestResult variable and pass it into TestRegistry::runAllTests as done in the StackMain.cpp example in Code Listing 3.
Code Listing 3 - StackMain.cpp
13. Add a file named corresponding to the class to be tested. In the example, the Stack class is being tested, so the file is named StackTest.cpp. The code for this file is listed in Code Listing 4.
Code Listing 4 - StackTest.cpp
13. Set the .Tests project (Stack.Tests) as the startup project by right-clicking on the project and choosing Set as Startup Project.
14. Build all the projects.
15. Make sure to choose the same emulator or device for all three projects otherwise multiple emulator windows may pop up.
16. Run the project. Hopefully, a message stating "There were no test failures" is then displayed in the Output window as shown in Image 9.
Image 9 - Successful Test Run

Aside from the examples that come with CppUnitLite, there are additional examples within Working Effectively with Legacy Code.